I donated a LOT of scrappy stuff to the Girl Scouts a couple of weeks ago and in doing so, we found an old photo album of John's. I thought I had scrapped all of his childhood albums. Obviously not! So I'm scrapping! I'll share a few layouts here and there as I do them. Thankfully the album was a paper one and his mom used photo corners, so they weren't in one of those horrid sticky ones that were so popular in the 70's.
We'll start with John's Paternal Grandfather. I've covered up his name to protect the innocent! Grandfather died long before I came on the scene, but John has very fond memories of travels with his grandparents. They took him on a vacation with them when he was small and all he wanted to eat was Kentucky Fried Chicken. He says they went to a "white tablecloth" restaurant one night for dinner and he said Grandfather wanted to throttle him when he asked the waiter if they had Kentucky Fried Chicken!!
Paper is CTMH Back Country (retired) and I used Pinky to cut the tree embellie. The border is also retired CTMH Color Ready Borders that I used Sparkle and Sprinkle Golden Follies embossing powder on.
Tuesday, January 31, 2012
Rockin day 31
YEE HAW!!! I did it. I actually posted every. single. day. this. month! But because I can't add, I've got a few extra cards I did, so I'm gonna rock this over to February. Just to finish them up. Then I'll be moving on to other things.
Monday, January 30, 2012
Sunday, January 29, 2012
Metal?
I've been stalking Twitter the last few days looking for new ideas and sneak peeks of new products coming out at CHA Winter in Aneheim, CA. t!m's right hand man and faithful assistant Mario has been great about Tweeting BTS (Behind The Scenes) pics for those of us not fortunate enough to attend. He posted a couple of really cool things the other day showing what the people taking the classes t!m was teaching were getting to do. This is one idea that I tried to replicate here at home. A Faux Metal tag. For a change, I took pics while I was doing the project so I can explain what I did. It may not be exactly like the one they did in class, but I'm pretty pleased with the way it turned out! I think I may have to go to Home Depot or Lowes and invest in some Aluminum Tape. I used Aluminum Foil and when I was trying to burnish it around the letters, it kept tearing on me. I think the Aluminum Tape would probably be stronger. So without any further fanfare, I bring you...Metal?
On the right is the tag that the class created. They did 15 tags in total during Thursday's class.
My tag. I found a chipboard tag in my stash and decided to use it. Used chipboard letters from various mfg's from my stash and the purple stuff is Magic Mesh. I've had it around for.ever!
Cut out different size pieces of aluminum foil with my cutter.
Used Claudine Helmuth Studio Multi-Medium Matte to adhere the aluminum foil to the chipboard. Overlapped pieces so it was more dimensional.
Used my embossing stylus to burnish around the letters and over the Magic Mesh to make them stand out better. Used the closed tip of a pen to make the "rivets." Necessity is the mother of invention!
Once everything was covered, I used Claudine Hellmuth Studio Charcoal Black Acrylic Paint over the entire tag, making sure it got into all of the nooks and crannies really good.
Then took Kleenex and quickly wiped off most of the paint.
Used Pearl Ex in Aztec Gold and Super Copper and using my finger, spread it on different areas of the tag and then wiped with a Kleenex.
Showing some of the tag up close and personal!
One final shot. The Aztec Gold at the bottom was an experiment that I don't know if I'd try again. I swiped a bit of the Multi-Medium Matte and then followed with the Aztec Gold. It stuck! Which was kinda what I wanted it to do, but I think it's just a bit "too" Gold, but it was there and it was stuck and I couldn't get it off. I'll just call it a happy accident that I won't try again!
Rockin day 29
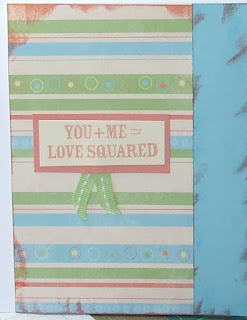
So I ended up with Verandah which is yet another discontinued CTMH pp. I've always loved the color pallette of Verandah. I also used up some Pewter Mini Medleys and Cocoa Ribbon Rounds. I stuck to the flowers in the Rock The Block stamp set and used sentiments from CTMH For Every Occasion.
Saturday, January 28, 2012
Rock The Block
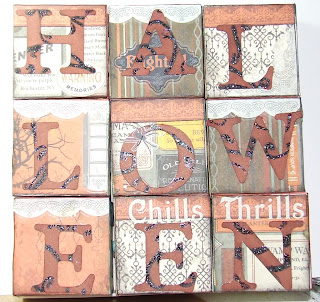
I decided I'd best get the January CTMH promotion done before January was over. What a concept!! Most people did this with photographs, and there was always someones ear or top of their head or other body part on a different block and I thought it just made them look funny. A sister CTMH Consultant (and I don't remember who) did hers for different holidays and I thought that was a perfect idea, so that was the direction I took. I couldn't do my usual of putting all sorts of flotsam and jetsam on them since they have to lay pretty flat in the box, so I had to rely on Stickles to bling them up a bit. In the order of holidays, I did Valentine's Day and used retired CTMH Cherry-O. Easter is done with CTMH Elemental. July 4 is done with retired CTMH Independence. Halloween is done with CTMH Mishchief. Thanksgiving is done with CTMH Dreamin and Christmas is done with CTMH Wonderland. I used the CTMH Art Philosophy cartridge to cut the alphabets and any other anything that is on the blocks. Hearts, flowers, butterflies, flowers, etc. The Halloween and Thanksgiving blocks have rub-ons from the Compliments Rub-ons. I used red, silver and blue Stickles on the stars for the July 4 blocks. And see if your sharp eyes can find the two letters that dummy me put on backwards! Why do I see that after they dry?! Oh well!
Friday, January 27, 2012
Rockin day 27
And that's it for Caboodle. I never would have thought I'd get so many cards out of 1.5 sheets of B&T and a few scrippy scraps of cardstock! Amazing what female ingenuity does for ya, huh?! And now lets see what else I've got that needs to be used up for the last few.
Thursday, January 26, 2012
Wednesday, January 25, 2012
Grungy Monday 34
Linda has another great challenge this week for the Grungy Monday challenge. It uses Distress Crackle. You can see all the deets here should you want to play too!
http://studiol3.blogspot.com/2012/01/grungy-monday-34-were-cracking-up-over.html
I pretty much stuck to t!m's example of using the Crackle directly on a Kraft tag. Watch his video here: http://www.youtube.com/watch?v=43m8eiQZ3P0
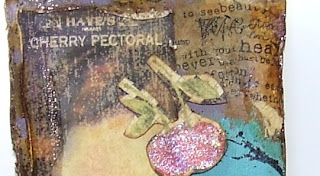
I used Broken China and Dusty Concord on my tag and let it dry, then distressed it even more with Gathered Twigs Distress Ink. I wiped some of the ink off the Crackle with a wet cloth. Then used some 7Gypsies Tissue Paper on various areas of the tag, smooshing it up and then inked it as well. I distressed the edges of the tag and inked them with Gathered Twigs. I had some vein-y looking rub ons in my stash from long ago and don't remember who the mfg was. I applied them in different areas of the tag. The lady and cherries are from a sheet of Graphic 45 dp that I cut out and distressed. I added a bit of Diamond Stickles to the cherries and pop-dotted them for dimension. I also had some bottle tops in my stash, so I pulled one out and used a stamp from t!m's Visual Artistry line to stamp the weedy plant and then used Broken China and Vintage Photo Distress Inks to age it, then put it in the bottle cap and Gloosy Accent'd the top to seal it. I also used a foundry pin and a piece of seam binding colored with Gathered Twigs. Once everything was on the tag, I splotched Crackle Rock Candy here and there on the tag for just a bit of sparkle and shine.
Tuesday, January 24, 2012
Monday, January 23, 2012
New product sneak peek
Yep, it's that time again. Feb 1 is the day the new CTMH Idea Book goes live to customers. I am once again participating in 2nd Upline Susan's team swap. I normally do two rounds but I was having too much fun and this time I'm doing three! Debbie will reap the benefits since all of the cards I get back will go into the box for her Run/Walk in April.
The first set is made with Footloose. It was my top choice when I saw it in the book. So beachy, summery, FUN! I always buy the Workshop on The Go (WOTG) because it comes with a stamp set and at least one and usually two sets of embellishments and it's cheaper to buy the WOTG than to buy all of the components separately. Plus you get a booklet that gives you two layout options and options for cards as well. I used my wave cutter to cut the Lagoon blue piece along the left edge of the card then used Stardust Glitz Glitter Glue on it and the seahorse. I used the Bamboo cardstock and using every stamp in the stamp set, Random Stamped the cardstock then cut it up to use on my cards.
Second is Pemberley. This one was a close second as far as favorites go. Until I saw it in person! It quickly became number one. It is so my colors! Love the blues, yellows and soft greys. I used Pinky to cut out the cards. (LOVE that the CTMH Art Philosophy Cricut cartridge has cards that the machine cuts out FOR you! This one also uses the new Wooden Shapes-Flowers which I used my markers to color and then used Glitz Glitter Glue and Liquid Glass on. We have new color ready seam binding too and I used t!m's method of swiping my ink on my mat then spritzing with water and coloring the seam binding that way. Love the look it gave. I used two different patterns of the B&T to use as the bases and I don't know which one I like better!
And finally is Crusin'. This is gonna be a great seller for all those vacation pics. Corp was also very clever in using the map of Texas on one side of the papers since Convention will be in Dallas this year. The bottle caps add just that little extra something. And it's hard to tell in the pic, but I used Liquid Glass on the gas pump for some shine.
Sunday, January 22, 2012
Saturday, January 21, 2012
We be jammin'
It was a jammin mess here last week. I put in a special order at the grocery store for two flats each of strawberries and blueberries to make jam with. It had been a few years since I'd made it and I had forgotten what a huge undertaking it is! John pitched in and was my washer, picker, masher man one day and a fine job he did! I don't even know what my final tally was, but suffice it to say, we now have plenty of jam to enjoy for ourselves and to share with friends and family.
Blueberries ready to be prepped by John
Washing and picking. The chickens got the strawberry tops and any underripe blueberries. Oh the chicken chatter at the coop that afternoon!
Mashed blueberries in the pot. They turn purple as they cook.
Mashed strawberries in the pot.
Finished blueberry jam. I did 1/2 pints and pints of both the strawberries and blueberries.
Subscribe to:
Comments (Atom)


